
Disclaimer: I wrote all of this around 10 months ago. I meant to try it again to make sure it was reproducible, but didn’t get around to it. Even unfinished, I think there’s useful information in here, so I’m posting this today to cohost (which shuts down at the end of the month) as well as here.
a couple months ago, I had made plans with a friend to make gluten-free gyoza but waited until the last possible minute, noon that day, to start looking at recipes, because I needed to buy groceries. this is the result of my last minute cobbling of recipes which, against all odds, turned out great.
some of these details might be fuzzy because I couldn’t take notes while I was in the middle of things (past a certain point, my hands were covered in rice flour and dough as I was making ~50 wrappers)
overview
so, you want to make gyoza that threads the needle on some dietary restrictions. this is a pretty involved procedure, expect to spend several hours. I did not plan ahead for that, started in the late afternoon and finished the last batch at nearly midnight lol.
wrappers
these will be made from scratch. you’ll want to get started on these early (maybe even on a different day) since it’s one of the more time-consuming parts of the process
I heavily referenced this recipe by Bianca Zapatka. I also looked at two others (1 2) but they didn’t seem as promising. This one was linked from a comment on this reddit post.
The main thing that made her recipe stand out to me was her description of why the ingredients are in the dough:
Rice flour: this comes in different varieties – white, brown, whole rice flour, and sticky rice flour. However, for gluten-free dumpling dough, we need fine white rice flour as it is finer than the other varieties. It has a very powdery consistency and bright white color. It is available in large supermarkets, Asian or organic markets, health food stores, or online.
Tapioca Starch: This vegetable binder replaces the natural binding property of gluten from grains here. You can also find it in Asian or organic markets, health food stores, or online.
Xanthan Gum: provides more elasticity so you can shape the gluten-free dumpling wrapper better without it cracking and breaking. Alternatively, you could substitute a little more guar gum, but I wouldn’t omit that special ingredient. Both are available at health food stores or online.
Salt: for flavor.
Hot water + oil: to make the dough smooth.
I did not follow her directions for the filling, though, because my goal was to asymptotically approach the experience of eating regular gyoza.
filling
I made two fillings – one with ground pork, and one with food processor’d firm tofu crumbles.
I followed this recipe by Nami at Just One Cookbook. I proceeded through the recipe until reaching a point where the ground pork needed to be added, at which point I set about a quarter of the filling aside as a base for the tofu filling.
For the tofu filling, I had looked at this recipe, also from Nami at Just One Cookbook, but didn’t follow it. (aside from pressing liquid out of the tofu)
Instead I went completely off the rails and blended firm tofu and a dollop of red miso paste together in a food processor, which produced some pretty yummy savory tofu crumbs. I recommend trying that if it sounds interesting to you!
(I’m not sure how the texture of the tofu filling would be affected if you didn’t use a food processor.)
ingredients
I made about 52 gyoza. Multiply these quantities if you want to make more or less.
wrappers
(for these quantities, I multiplied Bianca’s recipe by 1.4 to go from 36 dumplings to 52)
- fine white rice flour
280g (200*1.4) - tapioca starch
112g (80*1.4) - xanthan gum
3tsp (2*1.4=2.8 round up to 3) - salt
.75 tsp (0.5*1.4=0.7 round up to .75) - hot water
252ml (180*1.4)- note: this ended up being not enough, and we added about another cup of water. I think it’s better to start with not enough water, since you can add more later to get the dough to the right consistency
- i’m not really sure how hot this needs to be. you’ll be handling the dough so it shouldn’t be boiling, consider combining with cold water until it’s a reasonable temperature
- avocado oil
1.4tbsp (1*1.4)- you can use another mild cooking oil, this is what i used.
filling
(this isn’t exact. some of this is just stuff we had around.)
- garlic
2+ cloves - ginger
1tsp - cabbage
~140g, 2-3 leaves - green onion
2 (0.5oz, 15g) - little carrots
a couple? idk? these were just laying around. - shiitake mushrooms
2 - lotus root
i don't remember how much - tamari soy sauce (kikkoman)
1tsp - mirin (in place of sake)
1tsp - toasted sesame oil
1tsp - kosher salt
1/4 tsp
for the ground pork filling
- ground pork
340g (but I just used an entire package. doesn't need to be exact)
for the tofu miso filling
- red miso paste
a couple dollops of a small spoon - firm tofu
half a package
equipment
handy equipment!
- food scale for measuring dry ingredients
- silpat mat for working with dough on. you’ll want a lot of space
- grater for ginger
- peeler for veggie
- food thermometer, if you want to use that to check for when they’re done cooking.
- something that you can use to cut circles of dough, like a cup
- disposable gloves are nice since your hands will get messy. especially if you’re making the ground pork filling
- rolling pin for making the dough flat
- food processor for preparing the components of the filling (you can do this by hand but it will take longer to get a fine consistency)
required vessels: - for the dough
- large bowl for making the wrapper dough in
- measuring cup
- cling film
- for the filling
- large bowl for mixing the filling. two if you’re making two fillings.
- if you’re making the tofu miso filling, a large bowl to press the tofu in (something that can hold an amount of liquid)
- for assembly
- small bowl of water to make the dough sticky when sealing each dumpling
- plate to put assembled, uncooked gyoza on
- for cooking
- plate to put cooked gyoza on
- frying pan
- glass or bowl of water to use for steaming
procedure
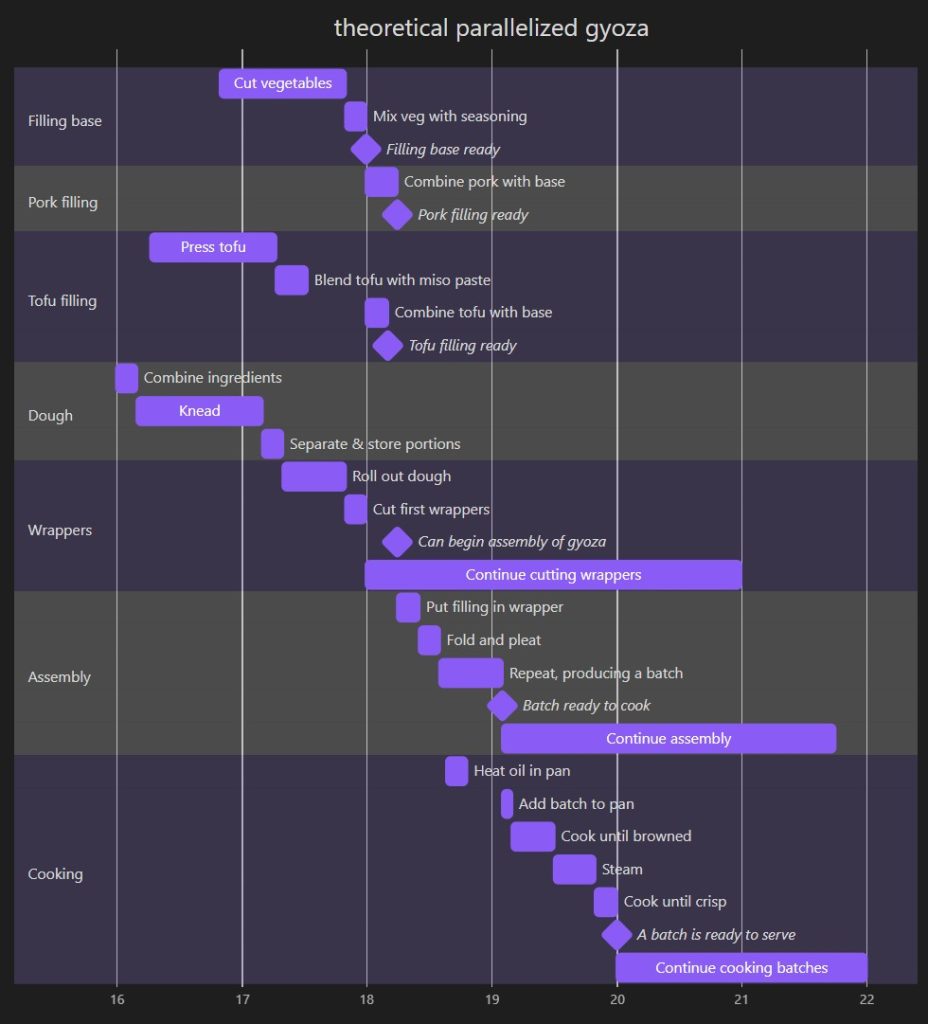
this can be parallelized to an extent. the wrappers will take much longer than the filling, but you can keep the filling in the fridge. consider what constraints you’re working within (e.g. how much space do you have in your kitchen, how many clean bowls do you have, and how much help you have available)
here’s a high-level overview of the whole procedure. the durations of these steps are not meant to be representative of the time a step takes, just a visual aid. getting the dough to the point that you can cut out wrappers is probably the critical path early on, the bottleneck is assembly.
`mermaid` source code for the gantt chart
gantt
    title theoretical parallelized gyoza
    dateFormat x
    axisFormat %H
    tickInterval 1hour
    todayMarker off

    section Filling base
        Cut vegetables : f1, 3000000, 1h
        Mix veg with seasoning : f2, after f1, 10m
        Filling base ready : milestone, fb, after f2, 0h
    section Pork filling
        Combine pork with base : f3, after f2, 15m
        Pork filling ready : milestone, pf, after f3, 0h
    section Tofu filling
        Press tofu : t1, 1000000, 1h
        Blend tofu with miso paste : t2, after t1, 15m
        Combine tofu with base : t3, after f2 t2, 10m
        Tofu filling ready : milestone, tf, after t3, 0h
    section Dough
        Combine ingredients : d1, 0, 10m
        Knead : d3, after d1, 60m
        Separate & store portions : d4, after d3, 10m
    section Wrappers
        Roll out dough: w1, after d4, 30m
        Cut first wrappers : w2, after w1, 10m
        Can begin assembly of gyoza : milestone, w, after w2 tf pf, 0h
        Continue cutting wrappers : w3, after w2, 3h
    section Assembly
        Put filling in wrapper : a1, after w, 10m
        Fold and pleat : a2, after a1, 10m
        Repeat, producing a batch : a3, after a2, 30m
        Batch ready to cook: milestone, ac, after a3, 0h
        Continue assembly : a4, after a3, 160m
    section Cooking
        Heat oil in pan : c1, 9500000, 10m
        Add batch to pan : c2, after c1 ac, 5m
        Cook until browned : c3, after c2, 20m
        Steam : c4, after c3, 20m
        Cook until crisp : c5, after c4, 10m
        A batch is ready to serve : milestone, s, after c5, 0h
        Continue cooking batches : c6, after c5, 120mCode language: JavaScript (javascript)
wrappers
This procedure is adapted from Bianca Zapatka’s recipe. i highly recommend reading that as well, this is the most complicated part of the whole procedure.
- Whisk together rice flour (
280g), tapioca starch (112g), xanthan gum (3tsp) and salt (0.75 tsp) in a bowl. - In a measuring cup, whisk the hot water (
252ml, not so hot that you’d be burned handling it) with avocado oil (1.4tbsp). - Add the hot oil water to the dry ingredients and mix with a fork until the liquid is absorbed.
- If it is very flaky / crumbly, add half a cup of more water and continue to mix. Continue adding water periodically until you have a sticky doughy blob. I don’t remember how much I needed, I think it may have been another cup (~
250ml). The texture of the dough should be your guide here, in case your ingredients behave differently. - Prepare your work area. Once you start working with the dough, your hands will be covered in dough, making it difficult to context switch.
- Lightly dust your work surface with rice flour. (i used a large silpat mat as my work surface)
- Keep a large quantity of rice flour nearby since you will need it to keep the wrappers from sticking together
- Have all of these in arm’s reach:
- rolling pin
- cup or other circle-cutting tool
- somewhere to put finished wrappers
- these instructions if you’ll need to reference them. consider printing them out so you don’t need to unlock a device
- a little bowl with water in it in case you need to make the dough stick together.
- Transfer the dough to the work surface and knead it with your hands into a smooth and pliable dough. How to knead dough is out of scope for these instructions, if you aren’t sure, you might want to look it up before your hands are covered in sticky dough.
- Split the dough into portions by:
- Cut the dough into 4 pieces.
- Roll each piece into a ball.
- Wrap 3 of the balls tightly in cling film.
- Refrigerate 3 of the balls.
- Roll the dough out onto your work surface. Some tips:
- Aim for about 3mm thickness. If you roll it too thin, the wrappers will tear more easily when stretched. If too thick, you will make fewer wrappers and they will be thicker.
- Lightly dust the rolling pin with rice flour to keep the dough from sticking to it
- Consider how many circles you will need to cut to remain on-target for the number of wrappers you’re trying to make. e.g. if you’re making ~52, each quarter of dough needs to yield ~13 circles. FWIW I didn’t consider this until I’d gone through most of the dough, but it worked out.
- Lightly dust the surface with rice flour so that you can pick up the newly cut wrappers without them sticking to the surface too much.
- Once the dough is rolled out to an appropriate thickness, cut out one circle.
- Gently peel the wrapper up off of the work surface. If it doesn’t go well, consider the following adjustments to make:
- If the wrapper stuck to the surface and tore while lifting, next time, add a bit more more rice flour to the work surface than you had previously.
- If it tore because of being too thing, you could re-roll out the dough a little thicker.
- If it sticks to your fingers, dust your fingers with rice flour before trying to pick up the wrappers.
- If you need to make any adjustments, you may want to pick up the dough, roll it into a ball, re-dust the surface with rice flour, and roll it out again.
- Once you have picked up a nice circle of dough, add a generous dusting of rice flour to both sides of it, and set it aside. (wherever you’re putting finished wrappers)
- This coat of rice flour is really important since it’s what’ll keep the wrappers from sticking together as you stack them up.
- If you aren’t sure whether you’ve used enough rice flour, consider cascading the pile so that you stand a chance at pulling them apart if they do start to stick together. Check them periodically until you’re convinced that they won’t stick together.
- Continue to cut circles of dough out, dusting them with rice flour, and stacking them up. These are ready to have the filling added. If someone else will be cooking the gyoza in parallel, you can start to stuff enough of them to be cooked in a batch, and come back to making wrappers as you start to run out of those.
- Continue until you run out of dough.
filling
This procedure is adapted from Nami’s gyoza recipe at Just One Cookbook, i recommend reviewing that for some of the specifics.
I’ll start with the parts that were common to both the ground pork & tofu fillings, and then branch out.
- chop up all the vegetables that will be going into the filling, and combine in a large bowl. for most of these, i first roughly chopped and then used a food processor. do this according to your textural preferences (e.g. a fine chop to get small pieces in the filling)
- cabbage
2-3 leaves(you may want to discard the thick core, though I think I left it in.) - green onion
2 of them - small carrots
idk - shiitake mushrooms
2 of them - lotus root
- garlic
2+ cloves
- cabbage
- Grate the
1tspof ginger into the bowl - Add the seasonings: (IIRC I did this before adding the ground pork so that I wouldn’t need to figure out what portion was needed for the separate fillings)
1tsptamari soy sauce1tspmirin, which I used instead of sake since we didn’t have that1tsptoasted sesame oil (we used untoasted sesame oil since we didn’t have any toasted, but untoasted doesn’t really impart any flavor, so try to avoid needing to make that substitution)1/4 tspkosher salt1/8 tspblack pepper (freshly ground if you have it. i didn’t)
- Stir to combine loosely
- If you are making multiple fillings, separate the filling into two containers. I took out roughly a fifth to make the tofu filling, iirc.
- (this might be a good time to taste it and make adjustments, since you won’t be able to after adding ground pork, if you’re doing that)
ground pork filling
- continuing from a bowl of vegetables with seasoning added
- add the ground pork to the bowl
- knead the mixture with your hand until it is a pale color and is sticky (gloves are nice here)
- cover the bowl in cling film and refrigerate until ready to assemble gyoza
tofu miso filling
I made this up as I went – I wanted some kind of protein-containing volume fill for the pork-less filling, and this worked out well. You don’t have to use red miso paste but I think it works well here.
- continuing from a bowl of vegetables with seasoning added
- press liquid out of the tofu block –
- wrap it in a paper towel to draw moisture out and hold it. put it in a large bowl/plate that can hold liquid
- put a big heavy flat thing on top of it, and let time take care of it (e.g. baking sheet with a bowl or two on top)
- if you are in a rush you can try to squeeze it with your hands but don’t squeeze hard enough that it bursts through the paper towel. probably. idk
- put the tofu in the food processor
- take a couple dollops of red miso paste and put them in the food processor alongside the tofu. it has a strong flavor, i suggest trying some on its own and tweaking the quantity to taste.
- run the food processor to blend them together into savory crumbs.
- try some of them and add other seasonings if you want. you can do whatever here (i was just making this up as i went)
- when it’s good, put it into a bowl and set aside. you can snack on it if you want to (i did, and considered that a good sign that it was going to turn out well in the end)
assembly
you can start this as soon as you have a few finished wrappers and finished filling(s). this procedure is more-or-less copied from Nami’s gyoza recipe at Just One Cookbook, for completeness. you should read that.
- Prepare a small bowl of water. This’ll be used to seal the dumplings.
- Hold a wrapper in your non-dominant hand.
- With your dominant hand, take a small amount of filling and place it in the middle of the wrapper. (Experiment with the amount until you find something that works well. A ~teaspoon is probably a good place to start)
- With your dominant hand, dip a finger in the water and draw a circle along the top perimeter of the wrapper.
- Fold in half loosely and pleat starting from one edge (if you’re feeling fancy) or just squish it together if you’re tired because it’s been 6 hours at this point. The wet parts of the wrapper should be sticking to each other. If they aren’t, add more water.
- If you tear a wrapper, it’s OK, you can still cook it and it will still taste good. 👍
- Repeat until you run out of wrappers and/or filling. Try to use each at a pace so that you don’t end up with a bunch of extra wrappers or filling at the end.
You can freeze some of them if you don’t want to cook them all at once. If you do, don’t defrost when it’s time to cook them – just put them directly in the pan.
cooking
this, too, is more-or-less copied from Nami’s gyoza recipe at Just One Cookbook.
you’ll be cooking in several batches, depending on the size of your pan. you’ll also need to have a lid for that pan.
- Heat ~
1tbspneutral cooking oil over medium heat in a large frying pan of your choice. (we used avocado oil and a nonstick pan iirc) - Place in the pan one layer of assembled gyoza, flat side down, not touching each other.
- Cook until the bottoms are golden brown (maybe 3 minutes)
- Add
1/4 cupwater to the pan and immediately cover it with a lid. Steam the gyoza for about 3 minutes or until most of the water evaporates. (add 1-2 minutes if you’re cooking from frozen) - Take the lid off to evaporate remaining water.
- I didn’t do this, but it sounds good: drizzle
1 tsptoasted sesame oil over the gyoza - Cook uncovered until the gyoza are browned and crisp on the bottom. If you’re using a food thermometer, this is a good time to check the internal temperature.
- Transfer to a plate and repeat from the start until you’re done.
Leave a Reply